A minimalist Openbox desktop for Vim freaks
Are you the sort of person who is looking for a Vim plugin for everything? Does having to reach out for the mouse sideways cause you involuntary facial muscles twitches? Is breaking out the arrow keys with a screwdriver among the first few things you do on a new computer (after swapping Caps Lock with Left Ctrl, of course)? Then welcome, you’re among friends here.
UPDATE 2020-05-11: Updated instructions for Crunchbang++ 10 (based on Debian 10).
UPDATE 2020-12-20: Tips on avoiding fullscreen/SVGA related problems on reboot.
Table of contents
Overview
Now that we’re done with the formalities and have dissuaded normal computer users and non-fanatical Vim aficionados from reading any further, let’s get to the good stuff! I vastly prefer to use a Linux desktop for development and my trusty 32-bit Crunchbang Waldorf VM has just reached the end of its useful life because of my sudden realisation that I really need 64-bit support. I had spent a considerable time “vimifying” my old setup (more on that later), which, of course, I wanted to carry over to the new installation. This post documents all the hackery I needed to do on the stock install to achieve that.
We will use Crunchbang++ 10 (or #!++ 10)
64-bit as our starting point which is based on Debian 10
“Buster” stable. Why not use vanilla Debian instead?
Because I really like the choices Philip
Newborough had made for the original
Crunchbang series and it would be an awful lot of work to replicate them from
scratch. Crunchbang is small, fast, stable and prioritises function over
form—it’s the perfect Openbox based system for a minimalist. Instead of
reinventing everything, we will just make a few strategic tweaks here and
there to make it more Vim friendly.
Why VM? Because I also do music, graphics design and photography, and most creative apps on Linux just suck1, plus I don’t like dual booting. The performance hit is negligible nowadays anyway on these new 4 or 8 core Intel i7 CPUs. But most of the instructions will be applicable to non-VM installs as well as I will always make it clear whether a particular step is VM specific or not.
The bulk of the information presented in this article is a distillation of ideas, tips and config snippets from various online sources far too numerous to mention (or even just remember). Still, the old Crunchbang forums and the excellent ArchLinux wiki definitely stand out as the two best sources of quality information on more arcane issues that you can’t always figure out by reading the man pages alone.
Philosophy & main features
Although I like the concept of tiling window managers, after analysing my
common usage patterns I realised that they would be an overkill for my needs.
Most of the time I just use tmux inside a maximised terminal window and I
rarely use more than a single window per desktop. I like to put my browser
windows (Firefox with Vimperator2)
and PDF viewers (mupdf) onto separate desktops, so I
just need a way to quickly switch between them. Sometimes I need to view two
vertically maximised windows side-by-side on the same desktop (e.g. a
terminal and a PDF viewer), but that’s pretty much it. Anything else is so
infrequent and random that it can be just done easily with the mouse, which is
less than 5% of the total use cases, so efficiency really doesn’t matter
there. The important thing is that 95% of the time I won’t need to lift my
fingers off the home row with this configuration!
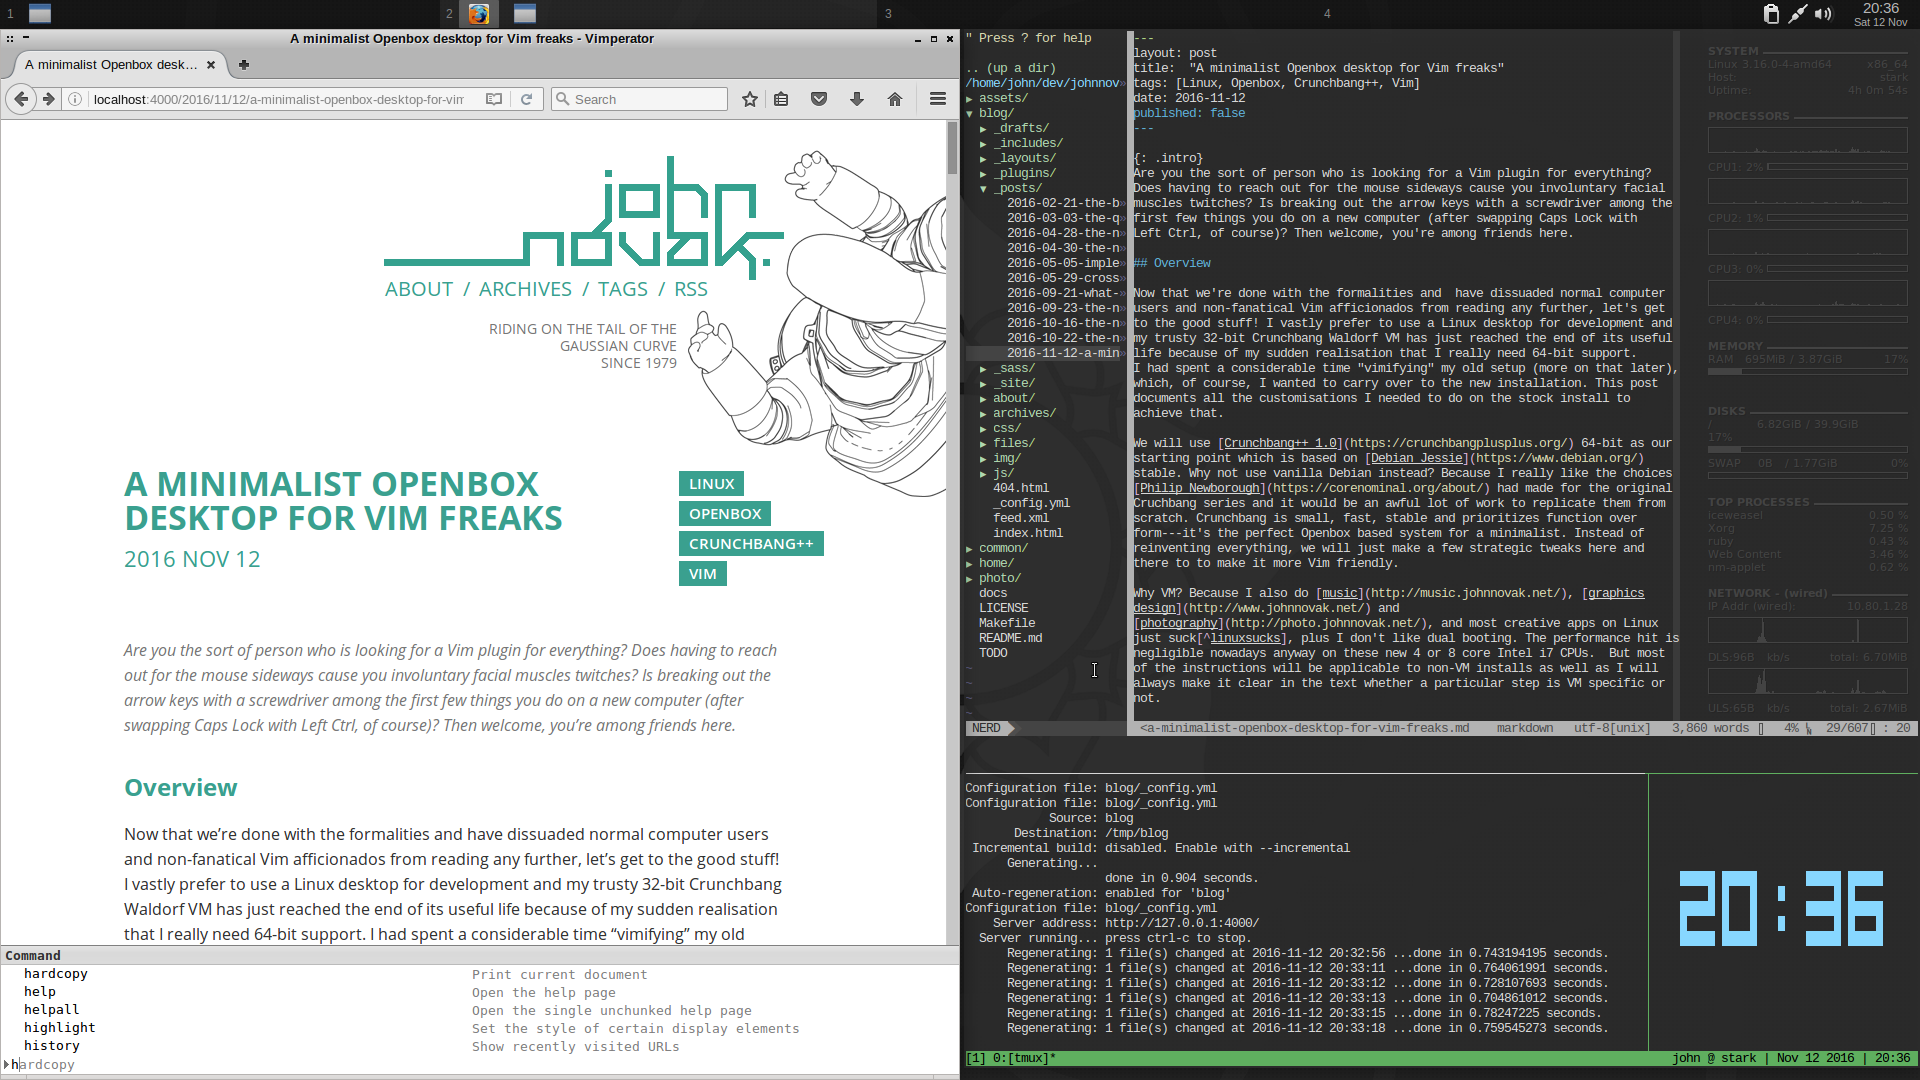
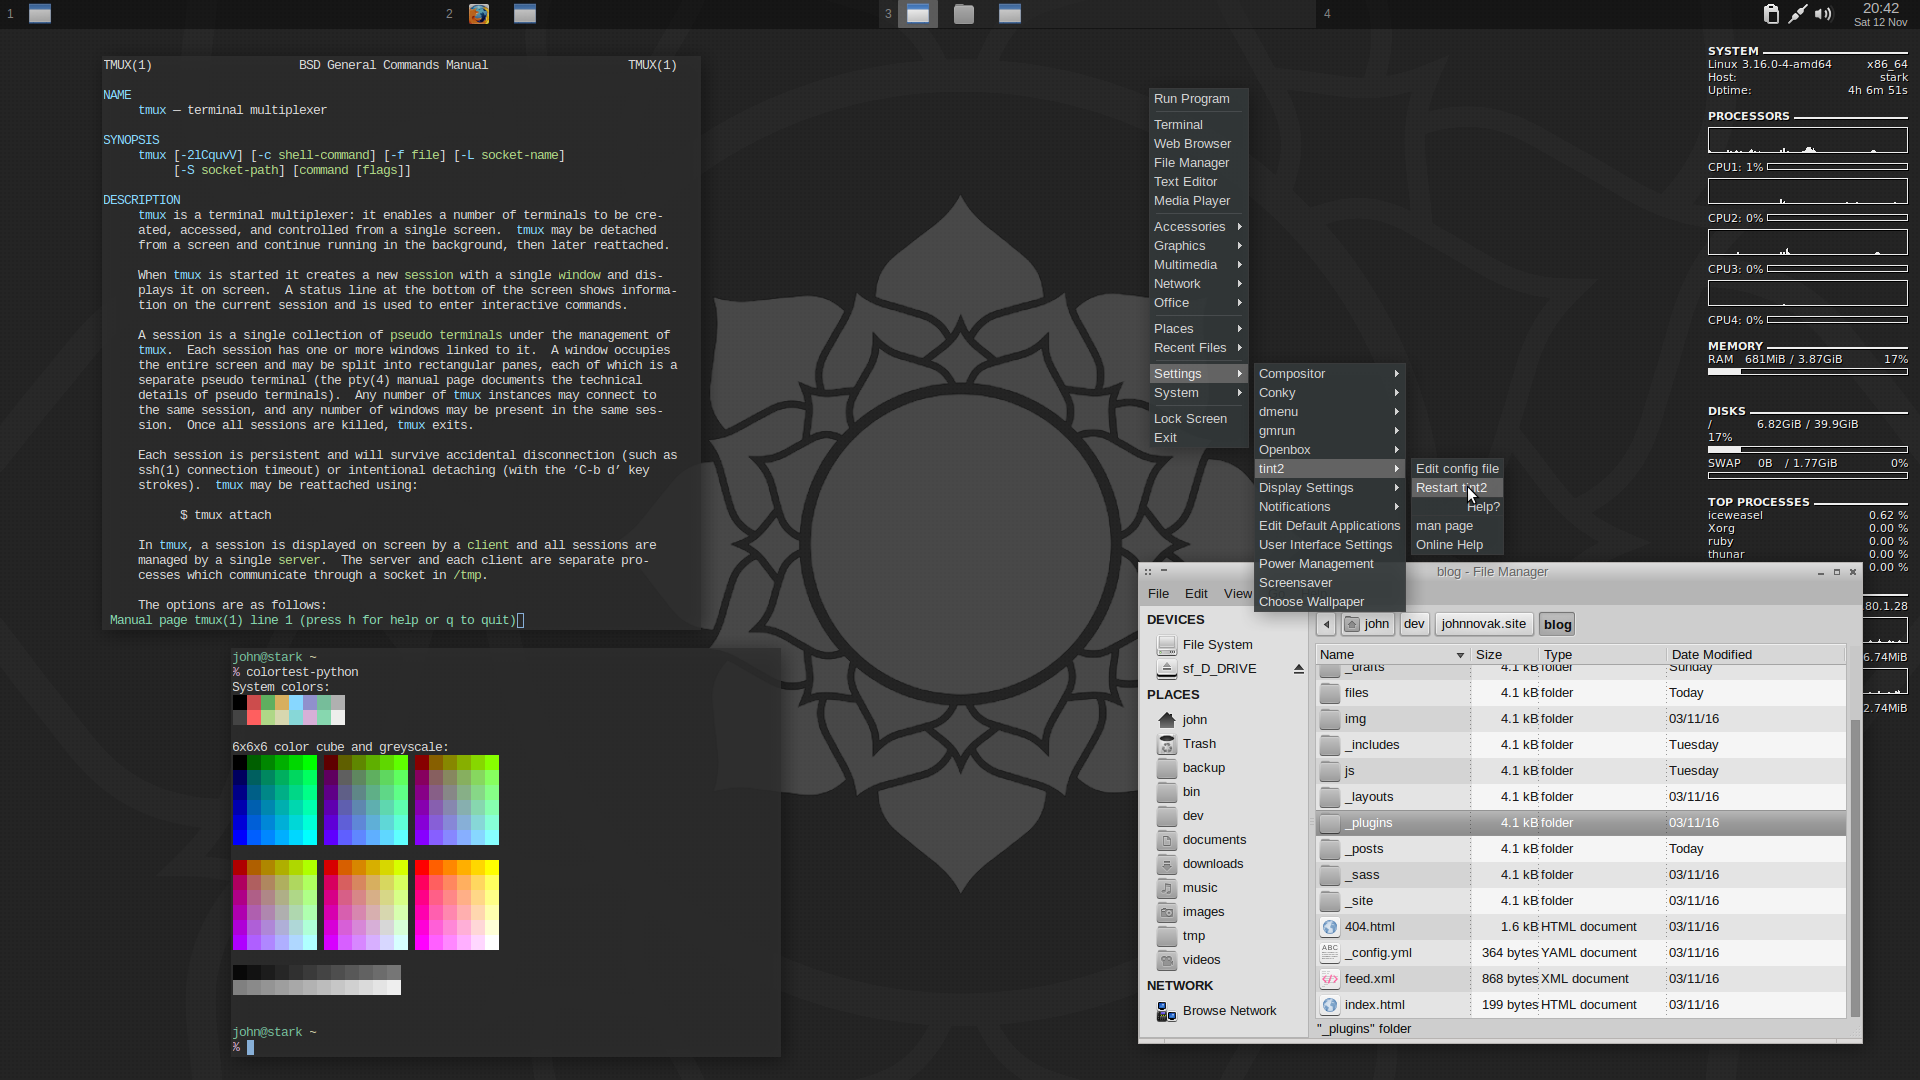
So, with all this in mind, let’s take a look at the main features on a high-level:
- Minimal & highly functional interface
- I find the default Crunchbang theme just perfect, so we will be building everything on top of that. The main components of the setup will be Openbox, zsh, urxvt, tmux and—of course—Vim.
- Global Vim-style navigation
- Seamless navigation between Vim splits and tmux panes, and a Vim-like way to switch between four virtual desktops.
- System clipboard support
- While Vim and tmux have their own internal clipboards, other GUI apps generally use the system clipboard, so we’ll need to invent a sane mechanism to interoperate between them.
- Mouse support
- I don’t use the mouse very much, but when I do, I want it to work correctly in tmux and Vim (e.g. changing focus, resizing panes, selecting & middle-click pasting text, etc.)
- Unified colour scheme
- I really like the Lucius Vim colour scheme (the default dark variant), so the whole setup will use Lucius dark colours consistently.
And now some screenshots, because everybody loves screenshots!

Some implementation details
In the following sub-sections we’ll take a detailed look at some of the more
difficult to configure features. I won’t go through every single line in every
config file because then I would be sitting here writing this article for the
next two months… Just take a look at
my dotfiles if you’re interested, or
better yet, clone/download the repo and run install.sh to set it up on your
system. The second part of this article provides detailed instructions on how
to set up the whole thing from scratch into a new VirtualBox VM (mostly for my
own reference, but perhaps others will find it useful too).
Navigation
Vim & tmux
Seamless navigation among Vim splits and tmux panes is accomplished via the excellent Vim Tmux Navigator. We’ll just use the default settings that will use the shortcuts Ctrl+HJKL to move between panes.
A side effect of this configuration is that we won’t be able to use Ctrl+L to clear the terminal anymore. There’s an easy workaround for that; we’ll remap Ctrl+L to <Prefix>+Ctrl+L in the tmux config:
bind C-l send-keys "C-l"
xmodmap
Hey, wait a minute, chief! What’s xmodmap doing here? xmodmap is a tool for modifying X keymaps and mouse button mappings. We are going to use it to differentiate between the left and right Alt modifiers when defining our Openbox shortcuts. I happened to come up with this bright idea of switching between desktops 1 to 4 with R Alt+JKL; and to send the current window to another desktop with L Alt+JKL;. Try them out, they’re really comfortable and quick to use from the home row!
This is how our ~/.Xmodmap file will look like. First, we’ll need to map the
keycode of L Alt to Alt_L and R Alt to Hyper_R.
Why Hyper_R and not Alt_R? Well, because my keyboard happens to generate
the keycode for Hyper_R when I press R Alt. To find out the exact
keycode for your keyboard (it might be different), use the xev (X Event
Viewer) utility.
keycode 64 = Alt_L NoSymbol Alt_L
keycode 108 = Hyper_R NoSymbol Hyper_R
After this, we’ll clear all existing modifier bindings and set our own. This is not strictly necessary as we’re just setting the defaults again for most, but I find this method cleaner and easier to troubleshoot because then we can see all the modifier definitions in one place.
clear Shift
clear Control
clear Mod1
clear Mod2
clear Mod3
clear Mod4
clear Mod5

add Shift = Shift_L Shift_R
add Control = Control_L Control_R
add Mod1 = Alt_L
add Mod2 = Num_Lock
add Mod3 = Hyper_R
add Mod4 = Super_L
add Mod5 = ISO_Level3_Shift
There’s one very confusing and non-obvious thing about this config that I will
illustrate with a concrete example. We are mapping Hyper_R to Mod3, yet in
our Openbox config we won’t be using Mod3 for any of the keybindings, but
just the hyper key directly (e.g. H-j, which stands for Hyper-j, which will
be bound to R Alt+J). The logical conclusion would be
that we won’t need to bind anything to Mod3 then. Not so! Due to the
extremely arcane ways how
applications need to communicate with the X server, Openbox can only get
keydown events for a modifier key if it is bound to one of the Mod*
modifiers. I’m sure the real situation is even more messy and complicated than
that, but this is all we need to know for our purposes.
One more thing, I like to switch Caps Lock with L Ctrl on all my computers, but we won’t need to do that here because I’m using SharpKeys on Windows for that purpose, and luckily the settings carry over to the guest VM.
Openbox
Ok, time to teach Openbox a few new tricks as well. Let’s start with setting
the number of desktops to four in ~/.config/openbox/rc.xml:
<desktops>
  <number>4</number>
  <firstdesk>1</firstdesk>
  <names>
    <name>1</name>
    <name>2</name>
    <name>3</name>
    <name>4</name>
  </names>
  <popupTime>875</popupTime>
</desktops>
Then we’ll disable the window decorations for urvxt and terminator because
they look much cooler that way:
<application name="terminator">
  <decor>no</decor>
</application>
<application name="urxvt">
  <decor>no</decor>
</application>
To recap, this is the final list of shortcuts for our Vim-style desktop (in addition to the standard stuff like L Alt+Tab to switch between windows, etc.):
| Ctrl+HJKL | Move between Vim splits & tmux panels |
| R Alt+JKL; | Switch to desktop 1 to 4 |
| L Alt+JKL; | Send window to desktop 1 to 4 |
| Win+Shift+HJK; | Half-screen tile window |
The only thing left to do is to remap the existing keybindings in rc.xml.
For example, this is how the desktop switching shortcuts look like. Note that
we need to bind to H-x (Hyper + x) for the shortcut R
Alt+X. Another interesting thing to note is that the key
; (semicolon) has to be specified by its keycode (47 decimal, 0x2f
hex). Again, xev is your friend to find out the keycode for a particular key.
<keybind key="H-j">
  <action name="GoToDesktop">
    <to>1</to>
  </action>
</keybind>
<keybind key="H-k">
  <action name="GoToDesktop">
    <to>2</to>
  </action>
</keybind>
<keybind key="H-l">
  <action name="GoToDesktop">
    <to>3</to>
  </action>
</keybind>
<keybind key="H-0x2f">
  <action name="GoToDesktop">
    <to>4</to>
  </action>
</keybind>
The send to desktop bindings will be very similar. Here’s the first one from which you can figure out the rest:
<keybind key="A-j">
  <action name="SendToDesktop">
    <to>1</to>
  </action>
</keybind>
Finally, we’ll just need to remap the existing window tiling shortcuts and we’re done. Example for tile left:
<keybind key="W-S-h">    	# HalfLeftScreen
  <action name="UnmaximizeFull"/>
  <action name="MoveResizeTo">
    <x>0</x>
    <y>0</y>
    <height>100%</height>
    <width>50%</width>
  </action>
</keybind>
System clipboard support
Getting the shared system clipboard (X11 selections) to work consistently across different GUI and command line apps on Linux can undoubtedly be a hair loss-inducing experience. One of the sources of confusion is that we are usually dealing with two clipboard buffers in X11 (called selections), not just one like on Windows and OS X:
First, there is the normal selection that most well-behaved GUI apps use for the Ctrl+XCV operations—this is officially referred to as the clipboard selection.
Then there’s the oldschool make-selection-with-mouse-and-paste-with-middle-click variant, which is called the primary selection.3
With bidirectional clipboard support enabled in VirtualBox, the Windows clipboard will seamlessly interoperate with X11 clipboard selection, so that is solved.
The problems start when we want to teach certain console apps like tmux and Vim, that have their own internal copy/paste buffers, to interoperate with the clipboard selection. But once we’ve solved that, we have full clipboard interoperability across everything, so let’s what’s the best way to go about it.
Vim
Teaching Vim how to do this is quite simple; we only need the following
mappings in our .vimrc:
vnoremap <C-x> "+x
vnoremap <C-c> "+y
noremap  <C-v> "+gP
inoremap <C-v> <C-r>+
However, we have now just overridden the default Ctrl+V block selection shortcut. Let’s remap it to Ctrl+Q instead (gVim on Windows does the same thing by default, by the way ):
noremap <C-q> <C-v>
This is almost good, but sadly it turns out that Ctrl+Q and Ctrl+S are reserved for an ancient terminal feature called flow control. We definitely don’t need that (well, you might, I don’t), so let’s reclaim these shortcuts and put them to a better use:
# reclaim Ctrl-S
stty stop undef

# reclaim Ctrl-Q
stty start undef
ALso, middle-click pasting into Vim works out of the box, so we’re done.
tmux
The situation gets a bit trickier in the case of tmux, we’ll need to resort to use an external command to get data in and out of the clipboard selection. All the following apply to tmux 2.8 or later, the solution was quite different with earlier versions.
The GTK+ clipboard manager ClipIt included with Crunchbang has a command line interface that can interact with the system clipboard (in theory), however, I could never get it to work (and neither could others, according to the old Crunchbang forums.) So we’ll need to grab another tool that does actually work, and the aptly titled xclip happens to just fit the bill:
sudo apt-get install xclip
We can now configure tmux to pipe our selection to xclip when we hit Ctrl+C in vi-copy mode:
bind -T copy-mode-vi y send-keys -X copy-pipe-and-cancel "xclip -i -sel clip"
And that’s it, yanking some text with y will copy it into
tmux’s internal copy buffer and the clipboard selection as well from now
on! Ctrl+V and Ctrl+Insert pastes
the contents of the clipboard selection without us having to configure
anything, so looks like we’re done here! Yikes!
Mouse support
Vim
Enabling mouse support in Vim is surprisingly easy:
if has('mouse')
  set mouse=a
endif
That’s it! This will let us navigate and resize splits with the mouse and use
the select/middle-click primary clipboard mechanism. Of course, you’ll need
a Vim version compiled with mouse support enabled for this (I recommend the
kitchen-sink vim-nox package that contains support for basically all Vim
features and several scripting languages).
tmux
In the more recent versions of tmux (2.8+), mouse support can be simply enabled with the following command:
set -g mouse on
Similarly to Vim, this will allow us to resize panes and select text with the mouse, and of course the middle-click paste selection will work too.
The usual select-then-release-left-mouse-button will copy the selection only into the internal tmux copy buffer; if we want it to be copied into the clipboard selection as well, we’ll need to press and release Y before releasing the left mouse button.
The handling of primary selections is a bit quirky: to paste the contents of the primary selection into a tmux pane, we must hold Shift while middle-clicking. To make a primary selection, we must again hold Shift while click-dragging, but this unfortunately bypasses tmux altogether, so multiline selections with vertically split panes won’t work very well (experiment with this a bit and you’ll see what I mean). The workaround for this is to maximise the pane before making the selection. To the best of my knowledge, there are no better solutions for this at the moment. I don’t use primary selections much though, so this is not a big deal for me personally.
System clipboard support – Summary
As a summary of the above, this table lists all the shortcuts we can use to interact with the system clipboard (X11 clipboard selection) in the various apps.
| GUI | Vim | tmux | |
|---|---|---|---|
| Cut | Ctrl+X | Ctrl+X | — |
| Copy | Ctrl+C Ctrl+Insert | Ctrl+C Ctrl+Insert | Y* |
| Paste | Ctrl+V Shift+Insert | Ctrl+V Shift+Insert | Ctrl+V Shift+Insert |
* When used to yank text selected with the mouse, press and release Y before releasing the left mouse button.
Installation
We’ll need the following ingredients:
- VirtualBox 6.1.6 (or newer)
- Crunchbang++ 10 64-bit image
- Internet connection (Crunchbang is based on Debian netinstall)
We’ll need to create a new VM with Debian (64-bit) selected as the guest operating system type. I’m on an Intel i7 4790k 4.0 GHz with 32 gigs of RAM, so I just allocated 4 CPU cores and 4 gigs to the new VM, and created a 40 GB dynamic storage on an SSD partition (recommended). Pretty standard stuff, but make sure that Enable PAE/NX System is checked under System / Processor / Extended Features, otherwise the installer will fail.
It is important to select VBoxSVGA instead of the recommended VMSVGA under Display/ Graphics Controller. Failing to do so will result in all sorts of problems after installing the guest additions and rebooting once or twice (e.g. black screen after reboot, defaulting to 640x480 and getting flooded with error notifications, etc.)
From this point it’s easy sailing—just insert the ISO and proceed with the install. I recommend using the text mode installer because the GUI one hung at some point during downloading the packages. Everything should be self-explanatory, just accept the default HDD partitioning scheme (or you can complicate things, up to you).
On first boot
About 30 minutes later, we will be greeted by the cbpp-welcome script
that will offer us to update the system and install some optional packages.
We’ll do that, but later, so just exit for now. Our first objective is to get
the desktop environment up and running, then we’ll do the system update, and
finally we’ll fix a few issues and perform some other usability enhancements.
Set zsh as the default shell
My first thing to do on a new system is switch to zsh, so let’s install
that quickly with sudo apt-get install zsh and then set it as the default
login shell. Just run chsh and enter /bin/zsh as the new value. Note that
the change will only take effect on the next login.
It is also recommended to set x-terminal-emulator to urvxt (after having
installed it) because the built-in Openbox menus use it:
% sudo update-alternatives --config x-terminal-emulator
Install VirtualBox Guest Additions
We need to install the VirtualBox Guest Additions to get fullscreen, bidirectional clipboard and drag-and-drop support working. This will also make the screen updates snappier and it will fix the default jerky mouse pointer behaviour, which is quite horrible. But before we could proceed, the kernel headers must be installed first:
% sudo apt-get install linux-headers-$(uname -r)
After this, select Insert Guest Additions CD image… in the Devices menu in VirtualBox. You might need to create a virtual optical drive first in the VM settings if you haven’t done so already (remember that you can only do that when the VM is shut down, otherwise the Add optical drive button on the Storage tab will be disabled).
Now we can install the additions:
% cd /media/cdrom
% sudo sh ./VBoxLinuxAdditions.run
Don’t forget to tick Shared Clipboard and Drag’n’Drop to Bidirectional under General / Advanced in the VM settings. Enter fullscreen mode (R Ctrl+F), reboot, and you should be rewarded for your efforts with a glorious fullscreen Crunchbang desktop sporting a fluid mouse pointer!
Perform system update
The easiest way to do this is to run the cbpp-welcome script again and let
it update the software sources and the system (answer Yes to the first two
questions). This will take a while, depending on the speed of your network (I
think it took about an hour for me). After this, you’ll have the option to
install a few more additional packages.
Enable autologin
If you’re the sole user of this VM, you’ll probably want to enable autologin.
Uncomment the autologin parameter in /etc/lxdm/cbpp.lxdm.conf (line 3) and
set it to your login name.
Installing Powerline fonts
Some people maintain that one can live a full and prosperous life without Powerline fonts. Needless to say, this is utter bollocks! Those in the know will surely follow my wise advice and install the Powerline symbols font with the following command:
sudo apt-get install fonts-powerline
The best way to make use of it is to set it up as a fallback font in
.Xdefaults:
URxvt*font: xft:Liberation Mono:pixelsize=13,xft:Literation\ Mono\ Powerline:pixelsize=13
Setting the right wallpaper
No desktop Linux setup is ever complete without a wallpaper, but, of course, the chosen wallpaper must be the correct one. Look no further than this!
… aaaand congratulations, you’re done. Enjoy your brand new vimified desktop! :)
Further reading
There are a few good ones though, for example I’m using the Windows version of Inkscape, but there’s really no match for Lightroom or Photoshop (if you want to recommend me The Gimp at this point, please save your energy). Moreover, the driver support for (semi-)pro audio interfaces is just non-existent on Linux, and let’s not even talk about the audio software front… ↩︎
Sadly, Vimperator has been discontinued since I originally wrote this article in 2016. It seems to have been fallen prey to the security tightening around the extension mechanism of Firefox. I’m currently trialing Vim Vixen as a replacement. ↩︎
There’s a third one called secondary selection too, but no one ever uses that for anything, as far as I’m aware. One less thing to worry about! ↩︎
Comments
comments powered by Disqus