Raspbian Stretch home server setup
UPDATE 2019-10-19: Added some warnings about the default exFAT cluster sizes.
UPDATE 2019-07-08: Added instructions on enabling exFAT support, made the fstab mounting command more robust, and added the Fixing boot problems due to bad fstab file section.
Table of contents
Introduction
Okay, so the Micro SD card in my trusty Raspberry Pi 2 torrent
box home server finally bit the dust after three years of steady
service, so I had to get a new one and reinstall everything from scratch (no
pun intended), which I have documented in this post in detail. What we’ll
cover here is how to set up the Pi running Raspbian Scratch with SSH, VNC
and FTP support, an external NTFS hard drive for storage, and the Deluge
torrent client with remote access enabled—needless to say, strictly for
downloading Linux ISO images only!
I have used a Raspberry Pi 2 B+ with a USB WiFi dongle for the purpose of this exercise—in theory, the process should be the same for the Pi 3 with its built-in WiFi. A word of caution to younger players: buy a proper Raspberry-approved power source that’s capable of providing stable 2.5A power; this will save you lots of headaches later on.
Also, a word of wisdom to my brothers and sisters: my broken 8 GB SanDisk card came with a 10-year warranty so I got a new 16 GB one for free! Always keep those receipts, guys! :)
These instructions are meant for a home server setup on a home network that’s not reachable from the outside internet. In my case, the network the server is on is behind a second router, so I’m not concerned with security issues too much. Don’t blame me if you use these instructions to set up a public FTP or something and then you get hacked!
Installing Raspbian Scratch
Download the offline NOOBS installation zip file from here.
Format a Micro SD card to FAT32 (I used the cheapest available SanDisk Ultra 16 GB, but my previous 8 GB SanDisk also worked fine. Some people reported problems with 32+ GB cards so going larger is not worth the trouble (and the price) if you’re gonna use an external HDD for storage anyway).
Unzip the contents of the zip file to the root directory of the SD card.
Insert card into the Pi, hook up monitor & keyboard and turn it on to start the installation process. Choose Raspbian when prompted and follow the instructions.
On the first boot you’ll be prompted to configure the WiFi access (if you have a Pi 2 with an USB WiFi adapter like me, or if you have a Pi 3), so have the WiFi password handy.
Enabling SSH access
Run
sudo raspi-configand enable SSH access under 5 Interface Options / P2 SSH.After this you can SSH into the Pi with
ssh pi@<IP_ADDRESS>and entering the root password.
Enabling VNC access
Follow these instructions under the Enabling VNC server section.
Now you can use the RealVNC Viewer to connect to the Pi from another computer by entering its IP address (don’t need the
:1at the end).(Optional) If the Pi is not hooked up to a monitor, the VNC session will use the default resolution of 720x480. To change this, run
sudo raspi-configand go to 7 Advanced Options / A5 Resolution to set a higher screen resolution. You’ll need to reboot withsudo rebootfor the change to take effect.
Alternative instructions about the whole setup can be found here.
Mounting an NTFS or exFAT formatted external USB HDD
When connecting the external USB drive, Raspbian will automatically mount it. Unfortunately, the default NTFS driver that comes with the OS can only mount NTFS partitions in read-only mode, so we’ll need to install ntfs-3g to get full read-write access (but we’ll unmount the partition first):
sudo umount /media/pi/<PARTITION_NAME>
sudo apt-get install ntfs-3g
Similarly, FAT is supported out-of-the-box, but you’ll need to install exfat-fuse to be able to mount exFAT partitions:
sudo apt-get install exfat-fuse exfat-utils
If you’re trying to format the disk to exFAT on Windows 7+, you’ll quickly
realise that you cannot select exFAT in the standard disk formatter GUI but
only FAT and NTFS. The trick is to use the format command in the console
(e.g. format d: /fs:exfat). You also might want to look into setting the
cluster size manually (e.g. to 4Kib) as the defaults tend to be quite large
(256KiB clusters for an 1TiB drive, for example, as summarised
here).
Let’s check the list of available partitions; the disk we’re looking for will
be most likely /dev/sda:
sudo fdisk -l
Now we can test the new driver by mounting the partition manually under
/media/USBHDD1 (assuming the whole disk only contains a single NTFS
partition):
sudo mkdir /media/USBHDD1
sudo mount -t auto /dev/sda1 /media/USBHDD1
Copy some files to /media/USBHDD1 to test that the write access works.
If everything went fine, we can mount the partition permanently by adding the
following line to /etc/fstab:
/dev/sda1 /media/USBHDD1 auto defaults,noatime,nofail,x-systemd.device-timeout=10 0 0
Reboot with sudo reboot to confirm that the partition gets mounted
automatically.
Note that we’re exercising some precaution here:
nofailmeans that the boot process will continue regardless whether the volume can be mounted or not. Without this we would end up in emergency mode if the volume could not be mounted for any reason, in which case refer to the Fixing boot problems due to bad fstab file section for instructions on how to get out of this rather unfortunate situation. Withnofailin place, the OS will at least boot normally so we can SSH/VNC into the box to rectify the situation more easily.x-systemd.device-timeoutsets the wait timeout in seconds for the mount command; you might want to set this a bit higher for drives that take a while to spin up.
Setting up an FTP server
For FTP access, we’ll use vsFTPd instead of the Raspbian default PureFTPd:
sudo apt-get install vsftpd
We’ll be really unsophisticated here (another term for “simple & easy”) and
just grant the root pi user read-write access to the whole external HDD.
Edit /etc/vsftpd.conf and uncomment/add the following parameters:
anonymous_enable=NO
local_enable=YES
write_enable=YES
local_umask=022
chroot_local_user=YES
user_sub_token=$USER
local_root=/media/USBHDD1
allow_writeable_chroot=YES
(Arguably, this is not as bad as it first seems because we’re restricting
access to /media/USBHDD1 only with chroot_local_user=YES.)
Restart the FTP server for the changes to take effect:
sudo service vsftpd restart
Now you should be able to connect to the box with an FTP client using the pi
user and the root password, and have full read-write access to the whole
contents of USB HDD.
Setting up Deluge
Apparently, there are some issues with the Deluge package that comes with Stretch. The reason is that it pulls down libtorrent 1.1.1.0 as a dependency instead of the previously used 1.0.11:
  As many I moved to Stretch from a Debian Jessie with Deluged 1.3.15 and
  libtorrent 1.0.11 installed, RPI3 is the hardware. I found a couple of
  issues and report them here if useful for any of you.

  Issue:
  -Deluged CPU usage really higher than before
  -Multi-tiers tracker torrents report "connection time out". A few are
  working but the large majority stay in this state. This is identified for
  trackers giving multiple tier 0 tracker addresses, e.g. IPTxxxxx
  - Error in log
Although I’m on a different hardware (Raspberry 2 B), this seems like a software issue so I had decided not to experiment with the new package but use this method to revert to libtorrent 1.0.11.
Installing the Debian Jessie version
Edit /etc/apt/sources.list and add the below PPA and Jessie backports repos:
deb http://ppa.launchpad.net/deluge-team/ppa/ubuntu zesty main
deb-src http://ppa.launchpad.net/deluge-team/ppa/ubuntu zesty main
deb http://deb.debian.org/debian jessie-backports main contrib non-free
Add PPA key:
sudo apt-get install dirmngr
sudo apt-key adv --keyserver hkp://keyserver.ubuntu.com:80 --recv-keys 249AD24C
Update package lists:
sudo apt-get update
Install Jessie version of libssl:
sudo apt-get -t jessie-backports install libssl1.0.0
Install Deluge, including the web and console modules:
sudo apt-get install -t zesty libtorrent-rasterbar8 python-libtorrent
sudo apt-get install -t zesty deluged deluge-web deluge-console
Prevent libtorrent upgrade during the next OS upgrade:
sudo apt-mark hold libtorrent-rasterbar8 python-libtorrent
sudo apt-mark showhold
Configuring the Deluge daemon for remote access
Start the Deluge daemon then kill it immediately (we’re just doing this so it creates the default configuration files on the first startup):
deluged
pkill deluged
Edit ~/.config/deluge/auth to set up the remote Deluge user. Delete the
existing contents of the file and add a new line in the following format:
username:password:level
We’ll use level 10, which gives full administrative acccess, so the new line will look something like this:
pi:<PASSWORD>:10
Let’s start up the daemon again and enter the console:
deluged
deluge-console
We’ll make a configuration change to allow remote connections to the Deluge daemon and then we’ll exit the console:
config -s allow_remote True
exit
Restart the daemon so the changes will take effect:
deluged
pkill deluged
Configuring the remote thin client
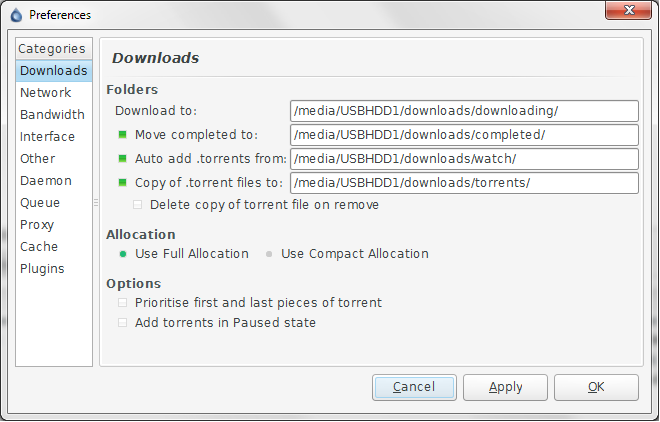
Create the following download locations on the USB HDD:
mkdir /media/USBHDD1/downloads/completed
mkdir /media/USBHDD1/downloads/downloading
mkdir /media/USBHDD1/downloads/torrents
mkdir /media/USBHDD1/downloads/watch
Download and install the thin client, start it up and perform the following steps:
Disable “Classic Mode” in Preferences / Interface then restart the client.
Add a new remote connection at startup (use the IP address of the Pi, the default port, and the username and password we set in the
authfile). If all went well, the icon next to the connection should turn green.Set the download locations in Preferences / Downloads to the directories we created:
Configuring the WebUI
Start the WebUI:
deluge-webOpen the WebUI in a browser:
http://<PI_IP_ADDRESS>:8112/The default password is
deluge. You’ll be asked to change the password on the first login, so it’s a good idea to just do that.Setting up Deluge daemon and WebUI to start automatically on boot
Edit
/etc/rc.localand add the following two lines before theexit 0command:sudo -u pi /usr/bin/python /usr/bin/deluged & sudo -u pi /usr/bin/python /usr/bin/deluge-web &Reboot and test that you can still connect using both the thin client and the WebUI.
Fixing boot problems due to bad fstab file
If there’s an error in the
fstabfile and one of the partitions cannot be mounted, Raspbian will go into emergency mode at startup. This means you won’t be able to access it externally via the network as loading the OS has been essentially aborted. So if you’re suspecting this is the case, the only way to remedy the situation is to hook up the Pi to a monitor and a keyboard and follow the instructions below.Confirming the issue
The first step is to confirm the issue. Make sure you see something like this on the screen when attempting to boot up the device:
You are in emergency mode. [lots of text, omitted...]

Cannot open access to console, the root account is locked.
See sulogin(8) man page for more details.

Press Enter to continue.
Pressing Enter would just reset the Pi and start the boot process again, so we’ll need to do something else to get out of the reboot loop.
Editing cmdline.txt
Switch off the Pi and take out the SD card; we’ll need to use another computer to append the following at the end of
cmdline.txton the boot partition of the SD card:init=/bin/shThis can be a bit problematic as I didn’t have much luck with trying to get Windows to recognise the boot partition, so I had to use a Mac in the end (another Linux box would work too, of course). After this edit, you should be able to boot into a minimal shell environment.
Remounting the root partition in read-write mode
The next problem is that we need to remount the root partition in read-write mode, so we can fix the
fstabfile:mount -o remount,rw /Fixing fstab
Now we’re on easy street, just edit
/etc/fstabwithviornanoand comment out the problematic line. We’ll also need to undo the changes we did tocmdline.txton the second computer after this.If you got it all right, you should be able to boot the Pi normally again. Then you can just carefully follow the Mounting an NTFS or exFAT formatted external USB HDD section again to correct the problematic mount command.
In closing
[This last section isn’t really warranted, but just finishing the post with some configuration steps didn’t seem quite right…]
That’s it folks, enjoy your shiny new 24/7 torrent box! Now go and download some Linux ISOs! ;)
Comments
comments powered by Disqus